Rose ~ Chic ~ Friends: My blog is all about you; friends and sharing lifes journey...My love for all things Chic; repurposed, crafted, painted in many venues... and My LOVE for all things Roses! which show up in my home and created projects.

Friday, July 12, 2013

2013 Where Bloggers Create

Oh My Gosh!
It is that time again already!
What a wonderful, fun event
Where Bloggers Create has become
each year. 
A HUGE shout out and thanks to
who spends many hours getting
this amazing event put together!
*****
Welcome to ROSECHICFRIENDS by
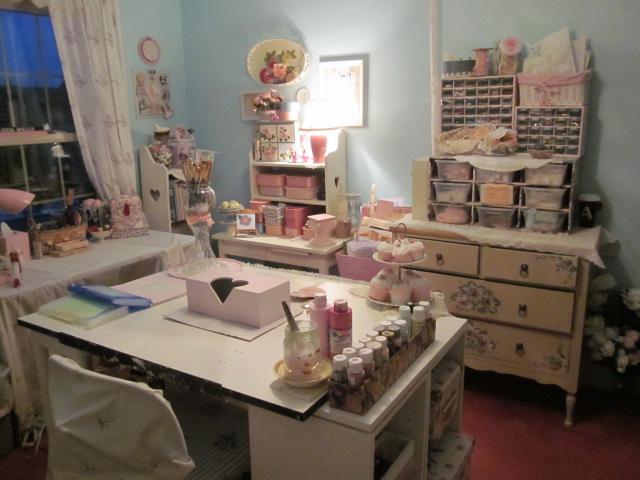
Lorena, or my creative space!
I am so happy to be participating again
this year, I believe this is my 3rd year!
Earlier this year, after the busy
Holiday creating times for me, I had a new
vision of how I wanted to tweak my room.
I seem to work in my room and then
manage to improve upon my area each year.
The main change for me this year was
creating a center work table surface space,
similar to ones I had seen on Pinterest.
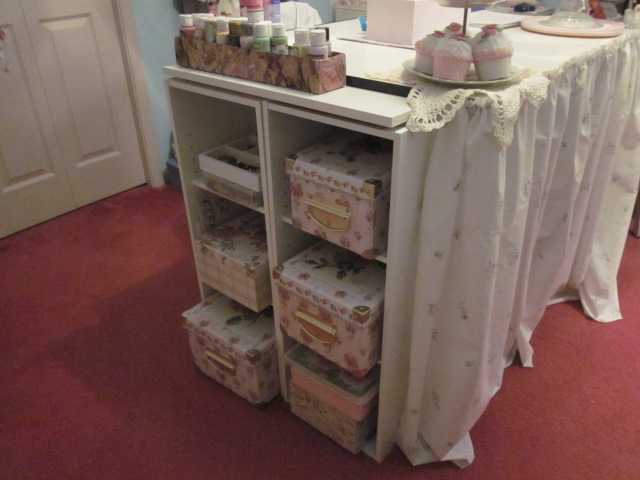
I created mine with what I had by using 2
white storage shelves and another plastic
shelf I had and then the top is off a drafting
table that my hubby had originally given me.
I did have to stablize it a make sure the
heights all matched but it all seemed to
work together for me pretty well.
I skirted the *ugly* area and love how it blends
in to the overall theme of my shabby chic room!
This table has worked Amazingly well for me now!
Am Loving how I created more surface space for me to
work on when I am in the midst of a million projects!


I am SOOOO happy with the reults and it has been
a dream to have this table now all set up for
extra work space.

So, on to the tour of the rest of my room.
This is a small room, about 10.5ft x 11.5ft but
I have loaded it up with eye candy that makes me
sooooo happy!

Oky, so now I will let the pictures to the talking.
I have taken lots of pictures for you...enjoy!


I cannot wait to get out there an see the many other
creative peoples room!

Thanks so much for stopping by and leaving comments
I really love them and appreciate you!


PS...a little of what has come out of my studio in 2013!


Tuesday, July 9, 2013

TUTORIAL ~ Easy Dollar Store Rose Petal Roses/Flowers

Hey Everyone!
Just popping in on a stormy early evening
here in Michigan
to share a simple tutorial that I put together.
I know there are soooo many roses tutorials
out there, but I didn't see one like this.
So, as I was making these today
for my crafting use,
  it dawned on me to share this
 simple way to make these
sweet roses with my friends.
SUPPLIES:
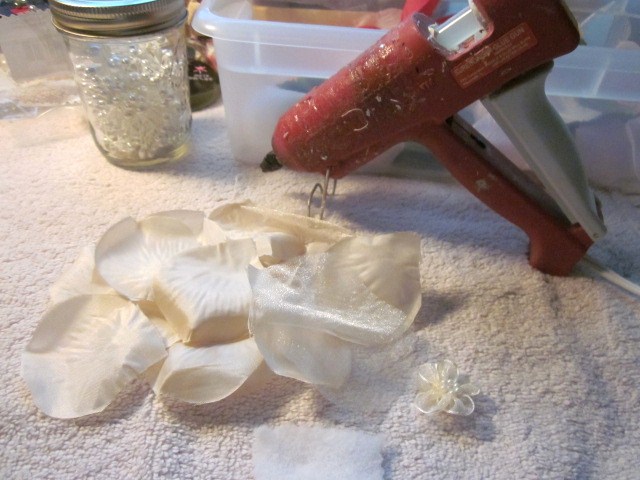
bag of rose petals
(I purchased mine a few years ago at
Dollar Tree)
Low Temp Glue Gun
Small piece of felt
Center piece
In the bag are white and pink petals that I stained
using coffee.  They give a vintage look.

First, cut a square or circle about 1.5 inches of felt.
Add a dab a glue around the center as shown.

Then, making sure the petals all face the same way.
Place them overlapping all around to create your base.  I used
5 petals to start with on the bottom/base.

Below, you see petals all added . 
You may need to
dabble a little bit of glue for added adherence.

Now start layering.  I added more glue to the center
and layered around with the petals
going around about 2 to 3 more times

another layer...

the last layer should have 3 petals

I then glued 3 gauzy petals on top of the other layers
(you do not have to do this, I just had them and like
how it looks)

The next pictures show how I finish the center.

Cut 3 petals at the point like below

then cut a slit in the center of each petal

glue the left side

fold over the right side to glue

glue back side overlapping all 3

this then creates a place for your center piece.
you can use buttons, pearls, earrings...

See? Simple and Pretty!

There you have it!
Let me know if you give this a try!
I am always checking available for
questions or clarification!

Thanks for stopping by!


Monday, June 17, 2013

Blogging

Hi Friends,
I am at a Crossroads right now with Blogging.
 
I do not know if there are others out there like me
or not.  I am NOT a techy person but can keep up
a little and that can be very dangerous! lol
 
With all the changes Blogger/Google is doing
 (many of which I do not understand)
and not having a techy expert to help me, I
feel like I am loosing ground.
 
So...as the past few months have shown,
I am blogging less and less.
Now, part of that is because I thankfully
have seen my wee little etsy shop business
pick up some.  For that I am grateful!
 
Blogging, for a time was a way to connect
with other like minded peeps.  It still is,
but so many now use it in ways I could
never use or keep up.
 
I guess what I am saying...
I will be here less and less.
Oh, I may do an occasional blog,
but I have seen less and less comments
and know others have become very busy as well.
 
Know that I appreciate those of you who
do stop by and comment...you are some of the
best out there!
 
Thanks and Love!


Saturday, June 15, 2013

BESTEST Easiest Peanut Butter Bars ~ Ever!!!

Hey there Friends!
Do you have childhood memories of food?
These Peanut Butter Bars are one of those
for me.  As a kid, if I got *hot* lunch at school
it usually was because Peanut Butter Bars
were on the menu. 
My mom, gave me this recipe many years ago when
she was weeding out her recipe.
  It was given to her by a friend. 
When I read it, I remembered
those bars we used to get...and well as they say,
The Rest is History.
I have adapted this recipe to what I remember as a child
and got in the school lunch.  Now
when I take these to parties and potlucks they always
receive rave reviews and a copy of the recipe.
It is easy and I hope you will LOVE them too!
(Here is the well used original recipe, it is quite Yukky!)

PEANUTE BUTTER BARS

1 Yellow Cake Mix
1 Cup Peanut Butter (I use Creamy)
1/2 Cup Brown Sugar
2 Eggs
1/3 Cup Water
Options: Choc Chips/Nuts
(I do not add as my fam loves them plain)

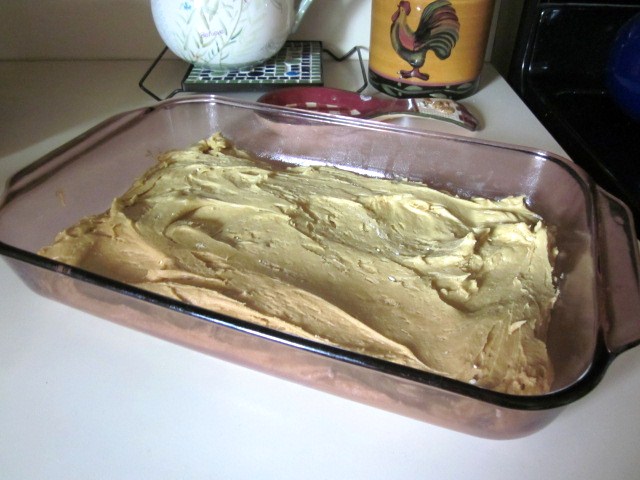
Mix all of these ingredient together. 

Your mix will be quite thick as you see below.
Spread evenly in pan.
BAKE: 350 for 25 Minutes


Once the bars get out of the oven, I pour my glaze over
the mixture and then let it cool

Peanut Butter Glaze

1 Cup Powdered Sugar
2 Tbls Peanut Butter
1-2 TB Water

I like this to be slightly thin.  But you can make
this to how you would enjoy it.


These bars are VERY moist and gooey and
you will not be able to eat just one!
Here above is a picture as it just comes out of the oven.
And below you see the glaze that has been poured
over the *hot* bars.  As it cools it will set up
and be so yummy!


I  wanted to make sure that I would have the recipe
for years to come
So I am sharing this with all of you!

Enjoy


Tuesday, June 4, 2013

Blog Shop ~ Join with me and the many others!

Hey friends!
 
If you haven't heard of BLOG SHOP
it is a great way to sell items you many
have around your home or on-line shops.
Our sweet Hostess is
 
I happen to sell my goodies on etsy at
so I invite you to stop on by for a visit.
 
Newest listed items in my shop are:
Clay roses for your craft and decorating pleasure.

Large pink clay roses magnets set of 4!

Sweetest decorated gift box.

Darling wood plaque/sign.

Set of 4 Westbend Canisters.
 
Many thanks!


Monday, June 3, 2013

Monday Morning Musing ~ A few of my favorite things!

Good Monday Morning Friends!

Okay...please do not think I have flipped...lol
Yes, those are my hands and feet you see in the
pictures!

I am always a bit late to get on board with what is new,
and painting my nails is one of them.  As an
artist I quit many years ago painting my nails.
Due to my hands in water, glue and just plain wear
and tear, it never was worth the time I spent.
Mind you, this girly girl was sad...;-(!

Until a few months ago, I had never hear of Gel Shellac
on fingernails.  While in Jacksonville, my sister
talked me into trying Shellac.  OH MY GOSH!!!!
I am in LOVE!
My first manicure lasted me 3 weeks with
no problems at all!

To say I am SOLD OUT on this method
 of painting my sweet lil fingers, is an understatement!
So...on Friday I went to have them repainted!
This will be a purely wonderful splurge that
I will be doing regularly from now on!

If you haven't heard of...or was wondering what the
fuss is all about...if you are someone who
works with your hands but wants them to still look
pretty for an extended period of time, without
damaging your nail...this is the way to go!

Okay....can I just say BLING!!!
While shopping a few weeks back with my
daughter at DSW I found these darling
Gellie Jems in the clearance aisle!
They were a tad more than I'd usually pay
but the Bling had me at *hello*!

Do you not agree?

Also just tucking in a picture of another sweet
repurposed thrift box I found!
Loving how darling this turned out with all its
vintage laces, ribbons and roses!

Have a great week everyone!