Rose ~ Chic ~ Friends: My blog is all about you; friends and sharing lifes journey...My love for all things Chic; repurposed, crafted, painted in many venues... and My LOVE for all things Roses! which show up in my home and created projects.
Showing posts with label tutorial. Show all posts

Wednesday, October 2, 2013

Framing Mirror In Powder Room

A few weeks ago I shared how I updated the
 cabinet and painted  Faux Granite Counters
 in our main floor powder room. 
Remember?
BEFORE
See the smaller frame?
and now
 
AFTER
See the beautiful gilded frame?

 
Okay, so during this time of updating I knew I wanted
to frame out the mirror. 
 Did you know that they have
larger already made up frames at Hobby Lobby?
Well I didn't.
  But I decided to wander back to the framing section
and boy did I get a huge surprise.
 With my measurements in hand I began the process of
seeing which ones met up with what I needed.
 
Of course this gilded gold frame was my first
choice and ended up being PERFECT!
And...it was 50% off,
or just $52!
I snagged that
baby up real quick and brought it home.
And guess what?
Hubs really liked it! Yay
 
Mounting to me was going to be the challenge.
But, with an engineering hubby we actually decided
NOT to glue this to the existing mirror.

What we did decided to  do was
add a couple of mounting
holders to reinforce the existing mirror to
be able to withstand the added weight of the frame.
 
In our looking for ways to mount
 the frame we found out that
Command Strip Brand now has an amazing
line of Damage Free Hanging Velcro strips
that can hold up varying weights.
We used ones that hold up 16lbs in 4
strips, bought two packages,
 and used all 8 strips, just to be safe.
(I was NOT compensated to tout this product ;))

I am so thrilled with how well this all came
together! What an additional POP of elegance this
mirror now makes to this tiny room.
 
Now this has me wondering how to frame
 the other LARGER bathroom mirrors we have.
I think these made need to be done a bit differently.
Stay tuned!
 
Now, do ya see that ugly
*hollywood* fixture...
well I have an idea running in my
head, we will see how it works out.
 
 
Yep...this one is making me smile real big!
 
Thanks for stopping by!


Linking to:


Wednesday, September 18, 2013

Bathroom Cabinet/Counter Reveal

Last week I gave ya'll a teaser with this picture!
I am here to share with you how it looks today!
 
I did some deep cleaning in here yesterday and
changed up some of my decor!
I am pretty happy with it now.
Below is how it looks today, yay!

 
We have lived in our home for 20 years.
Everything is pretty much builder grade in
this Tiny Powder Room.  From the darker
stained heirloom oak cabinets to the
almond sink and laminent counters.

Pretty basic and blah.
It needed brought into the new century!
 
Hubs and I love the wall color, which is Cranberry.
This was a $5 oops paint!!!
I must admit
I actually LOVE varying shades of golds
even though it is not the trend
I decided to stay with those choices in here.
 
But I felt this room needed a facelift and knew the
cabinet were a simple paint job that would help
to lighten this space.
My hardest part of the whole redo was
convincing hubbs to paint over oak.
What is it with Guys and Oak wood?
 
I cleaned and scoured all the surfaces.
Then I painted the cabinet, using a
RUSTOLEUM Ultra Cover Gloss in Almond.
After two coats and a few days to cure
it was done!
I am not going to seal because the semi gloss
leaves a great hard finish and this is a low
usage area.  If I were to do my kitchen or other
high used areas, I would seal.

 
Just to give you a better perspective,
just outside the Powder Room is a main
pass through area which houses our
small Bulter's Pantry. 
I am working in my mind on what I will
do with this area...stay tuned!

 
Then last Thursday I got my supplies together to
 paint my counter top.
 
I used Acrylic Paints in:
 Black, Bronze Metallic, Brown
and Gold Gleams (light Gold)

I have seen granite with these deep tones and that was
the look I was going for.
 
Black was the first color I used and sponged on. 
I then layered with the bronze, brown and the gold.
The overall feel I was going for had deeper
browns with a shiny glimmery finish.
I did go back to areas where I needed to touch
up the colors.  I did this until I was happy.
 
Then I suggest 1-2 coats of Polyacrylic like
I used on my Kitchen Island HERE.
It has a high gloss finish and makes it
shine like granite!

Now it has the look and bling that makes me happy!

I did bring in more mirrors to help reflect and give
off more light. This room can seem dark.
Above, if you look closely, you can seen
that I VELCROED a smaller mirror frame to
my window. Did this a looooong time ago
before Pinterest and Blogs show how these
ugly big mirrors can be framed.
 
This room is not completely finished as I
do want to frame the mirror and change
out the UGLY Hollywood Lights that
are in here.
I'll up date ya when that happens.

Just a few pictures of how my walls look now.


Now I am really happy with how well it all pulled
together!
I so hope I have inspired you to give painting your
cabinets and counters a try.
I am always happy to help and answer any questions
you may have, so feel free to ask!

 
Be Blessed,


Linking to:


Saturday, September 14, 2013

YoYo Pumpkins Tutorial (Recycling Old Sweaters)

It certainly is feeling like fall here in Michigan.
With that in mind, I wanted to share this
simple and easy way to make those darling
Pumpkins you see all over blogland, Pinterest and
on the web.
 
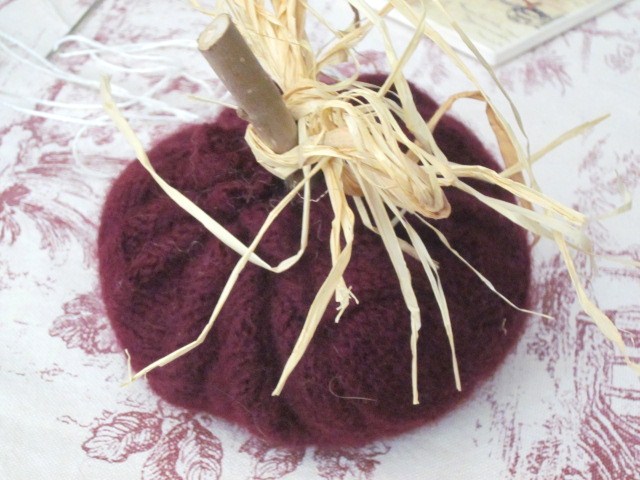
Here you see a few I have already made, a few years ago.
 
Lets Get Started with your Supplies:
 
Fabric/Sweaters
Batting
Sticks (you can get from nature)
Needle/Thread ( I use a thicker crochet thread)
Raffia, leaves, ribbons
 or other embellishments
Plates
(Varying sizes to use for pattern)
Glue Gun

Gather your fabrics and sweaters and supplies all
together.
For my pattern,
I already had some circles cut up, I used these fabric
rounds as my pattern for the sweaters I show below.
 
For your circles use the different sizes of plates
you have gathered.
 I used a saucer, salad plate,
and large plate for mine to have a more
varied size of circles.
Begin cutting your circles.
Side note:
Hubs and I did a MAJOR closet clean out and when I
was folding everything,
 I grab these two sweaters due to their colors.
Such a great way to recycle or upcycle
old clothing. 
I also cut off the arms for a
later project idea I have.

See my stack?
I am planning on making quite a few as I
sit and watch football with my family this weekend!
lol

 
So now your circles are cut lets begin sewing them. 
 
1. Thread your Needle and begin a BASTING stitch around
the top 1/3 -1/2 inch.
You will baste stitch all around the circle.
 I pull the thread as I go
and gather or create a hole.
2.  Now you have a circle complete with the mouth open
3. Fill with batting and tighten your thread.
4. Cinch and Sew up to secure, place stem in center
and then glue this all together and embellish

You can now embellish like I did with raffia, leaves
or even make varying sizes of pumpkins to stack
on top of each other.
Some people even fill these really tight and then
wrap with jute/rope to mimic real pumpkins.

The fun is using your imagination and creating
something just for you!
There is no right or wrong way to do these.

 
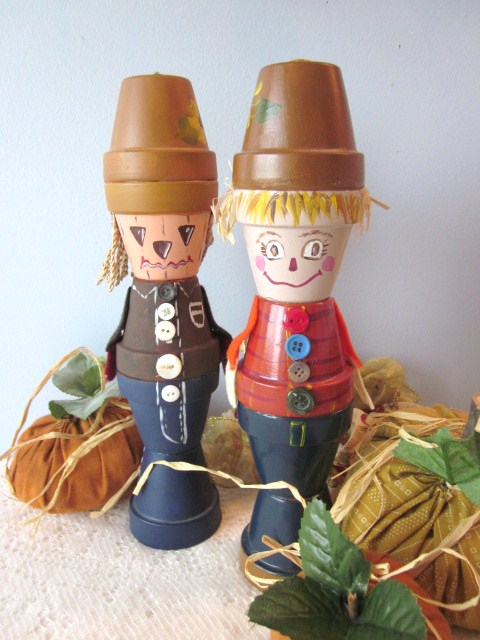
I have placed a few by the sweet lil Clay Scarecrows
I have made...tutorial is HERE.

Mr. Tiger has been having a blast with these!
I think there is something about the raffia that
is attracting him.  He will grab, claw at and
toss them all over, it is soooo funny to watch!

I would so love to hear from you if you give these a try!
Do you have other ways or ideas of how these can be used!
I would love to know!
 
I even made some up in Shabby pinks,
blue and greens!

 
Be Blessed!

 
Parties I am Link to:


Monday, September 9, 2013

Faux Granite Kitchen Island

Sweet Friends!
How are you? 
 
SO,
 hubs has been doing a LOT of traveling
 for business this past summer
and
that has left me with a LOT of time on my hands.
I have been scouring the web, blogs and Pinterest for ways to
spruce up my kitchen.  There is so much info out there
and being a artist/painter
I have been inspired to do what I can in an effort
to bring my kitchen into the new century.
 
We have talked about installing
granite and updating our cabinets for a while now. 
Finances and a daughter in college seem to be
getting in the way.  And with hubsters gone
 and exhausted when he's home,
 well,
 this type of a project
 is too big for us to handle right now. 
I am now resigned inspired to do what
I
 can to spruce up and update our 20 year old kitchen.
 
What does this girl do?
She pulls out her paints and sponge goes
to town!!!
 
I decided to just do the island for now. 
We did decide a huge MUST right now will be
to replace our sink and faucet.  When that is done then
I will probably do the rest of the counters.

For the granite look I was going after, I used the following
colors; Black, Metallic Bronz, Vintage Gold and Ivory.
Then 2 coats of Polycrylic Gloss by Minwax was applied.

I first cleaned the counters then scoured with scrub free. 
Making sure any left over residue was off. 
Since my base is already ivory I did
not prime or base coat the counter.
(If you are going to do this as a permanent fix for your
counters I would strongly do a primer base.)
Since I am only doing this, in hopes that it will
suffice for a couple of years I skipped priming.
The KEY to any paint project is a good sealant.
NOTE:
You do not need to be a painter to do this. 
If you have an idea of the type
of granite you want along with your color palet...
there really is no right or wrong way.
Work with the colors until you are happy!

Starting with black I sponged this color randomly all over.
Then applied the metallica bronz, gold and then finished
up with ivory until the entire island was just how you see it.
I did go back and forth with some of the colors until it
looked how I had envisioned it.
The colors are have a more muted gold than my picture is showing,
The pictures are actually picking up more gray than it really is.

I then waited to 2 days so that hubby could see it. 
I decided if he hadn't liked it,
it would still be fairly easy to remove the paint.
But he was happy!
I applied the 2 coats of polycrlic letting 24 hours
go by before I added each coat.
I do have some brush strokes showing and
I may use a sponge and apply another thicker coat
so that my critical eye wont be bothered by the strokes.
There are sprays cans of this sealer
which I may use instead of brushing it on.

I did take a few pictures for you to see my un-painted counters,

We are still debating whether to paint the cabinets
a creamy off white or gel stain to a darker stain.
UGH...my pictures actually show these cabinets looking a bit
darker than what they truly are.
Due to their age, they are fading and the stain
really is starting to yellow or orange.
I feel we need more contrast...but
convicing hubs to paint any or part of the
cabinets has been my biggest project. 


Stay tuned...
I am currently working in my small
red dark
Powder Room...
here is a sneak peak of what I have
done so far.
 
(hubs did relent and let me paint the Powder Room Cabinets, yay)

I will be working on the counters hopefully in the next day
or so.  Then I still have a few projects in here to do.
 
Thanks so much for stopping by today!

 
Parties I am Linking too!


Friday, August 23, 2013

FALL Clay Pot ScareCrows ~ Tutorial

Hey Everyone!
Like many of you, Fall is fast approaching and I
decided to revive and share a more in-depth tutorial
about how I create these darling Clay Pot Scarecrows.
Come Join Me in the FUN!

SUPPLY LIST:

5 Clay Pots (for boy)
4-5 Clay Pots (for girl)
(POTs can be any size you wish)
Acrylic Paints/Sealer
Buttons, Trims etc.
E600 or Household Glue
Thin Sharpie

Being an AVID crafter and artist I never do these
in the same colors...your imagination is your only limit.

BELOW:
I decided since I create in a world of shabby chic
I would show you the ones I recently made up in those colors.
Also, I came up with a *Girl* scarecrow this time...
thought she turned out so darling!


DIRECTIONS:

 Select the size of Clay Pots you want to use.  I am Using
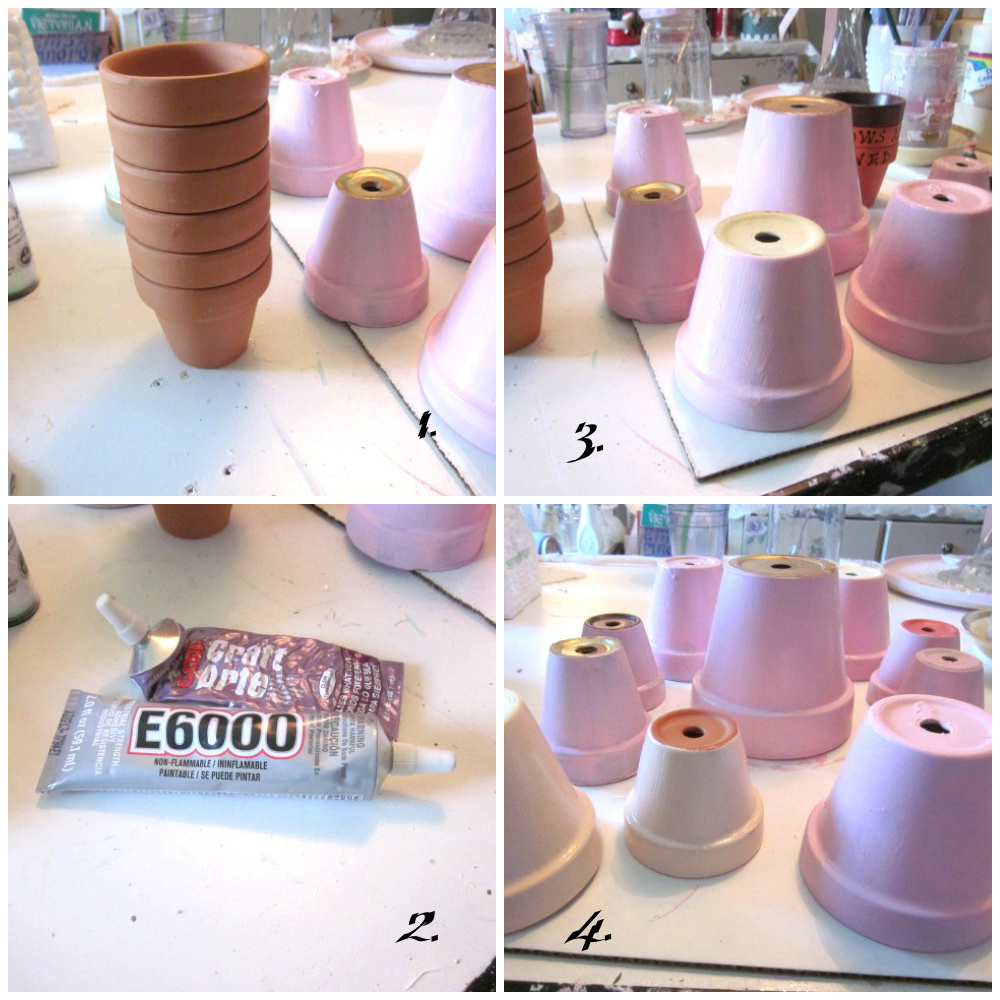
in this tutorial 3 inch pots.  I got these at Hobby Lobby, stacking
as you see in #1 of the 4 pix below. 
These were priced at $2.99, used their 40% coupon
so they ended up at $1.79.

2.  Determine the colors you will be using, then paint
as follows:

BOY
a.  bottom 2 pots Pant color
b. 3rd Pot color Shirt        
c.  4th Pot is face
 I use a  flesh tone but any light color can work
d.  5th Pot is for Hat  

GIRL
a.  2-3 Pots Painted for Skirt.
  (These 2 pots need to be slightly different in
size so that they stack correctly. Larger on Bottom
then smaller on top)
b.  3rd Pot Shirt color
c.  4th Pot hat color        

Now to begin assembling and gluing your pots on to of
each other.  You can see how to start below.  You begin
with the wider opening part as your base. 
I glue all around each
edge making sure they are secure.
Continue to stack until you have them stacked
 as you see in the bottom two
pictures of the 4 pix below.

NOW the Fun begins!
I always do a few faces up before I decide how I want
it too look.  Then using a fine tip Sharpie I added the
faces to the boy and girl.

For the arms, I did up a template.  Using Felt I had
in a fleshy tone I made 2 sets for hands, and in the
pink I did 2 up for the arms.


Once the faces are on, I seal the entire piece.
I then gather my embellishments...
buttons, ric~rac, lace and ribbon. 
For my girl, I painted my roses all around
her skirt.  On the boy, you can see faint detailing that I did
to mimic a shirt. I uses some light fringe trim I had to mimic
hair...but you could use fringes, straw etc. as well.

There is NO right or wrong way to do these.


Below I am showing you some done up in more traditional
Fall Colors.  Each one is so different and I had fun with
the trims as well.

I also have done them in larger pots as you can see
from my picture below. 

These pots can also be painted to look like toy
soldiers, as I have done below.  I pull these sweeties
out during the holiday and place by my door.


If you have any questions, or need clarification, please
do not hesitate to ask. 

I hope you will consider doing
these, they are so cute, easy and fun to do.
A great, inexpensive craft to do with children as well.

Thanks so much for stopping by,
I treasure your comments!


PS.  I am selling the pink set in my etsy shoppe!
I'd be happy to make up a set for you!

I am Linking to:

The Scoop over a White Lace Cottage this week!