Rose ~ Chic ~ Friends: My blog is all about you; friends and sharing lifes journey...My love for all things Chic; repurposed, crafted, painted in many venues... and My LOVE for all things Roses! which show up in my home and created projects.

Friday, January 27, 2012

***Hankie LOVE*** Sharing Display Ideas (Pink Saturday)

Hi Sweet Friends!!!

Welcome to my humble blog!
Today I am joining with Beverly over at
for our weekly Pink Party!
Please click on the link to visit other
PINK lovers!

My post today is around my LOVE
for vintage hankies. 
I have been collecting these for longer than
I can even remember.
I love them so much that I wanted to
incorporate them into the decor
in my Master Bedroom.

I hope you will be inspired to display
these wonderful pieces of history.
There are so many patterns and beautiful
arrays of floral that touch this
rose lovers heart.
Shall we get started?

These first two pictures are of Spoon Racks
that I have turned into hankie holders.
My sweet friend Rhea is the one that
I saw this done.  I LOVED this ideas
and asked if I could copy it!

This display wrack was actually a trash pick
that a friend gave me because she knew I
could come up with a unique idea for it...
These next 3 pictures below are of another shelf
I have in my bedroom.  I have some vintage
planters that I picked some pretty hankies
and placed them out for display in them.


This hankie is so special to me.
It was made by my sweet grandma who
we lost a year ago.  She was a lady ahead
of her time.  I credit her with the creativity
that GOD has given me.
This is sweetly folded, after pot pourri has
been placed inside...
and then sewn together as you see it.

My last pictures are of 3 hankies that I fell in love
with and found frames to place them in.
These are above the headboard.
Do you think these are just soooo purrrty?
I do, and I love the vintage feel they give to my room.

I so hope that I have encouraged you to think
outside the box.  Dig through your drawers and
find some unique ways to display hankies...
and
I'd love to hear your ideas!!!!

Be Blessed,
Lorena


Friday, January 20, 2012

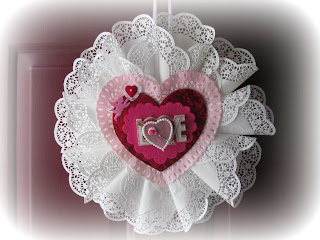
Paper Lace Doilie Wreath ***TUTORIAL***

Hi Sweet Friends!!!

Have ya missed me at all?
I can tell you that I have been a HAPPY
Happy Girlie crafting away in my newly
refreshened Craft Studio.

Today I whipped up this darling wreath.
I don't do much decorating for Valentines
BUT knew I wanted a unique, sweet
wreath for my front door.

So, while PINTERESTing I saw
a similar idea using book pages and
wanted to adapt one using simple,
cheap dollar store doilies.
(do any of you Pinterest?
Oh my, Oh my...)

Here's what you will need:

1 Package 7 or 8" Round Doilies
Round Card Stock  for Base
Various Heart Shape Goodies for Center
Glue Gun
This is EASY!!!
*****
Okay first, you take your doilie and
make it into a cone shape.
Glue on just the edges and
attach to your cardboard base.
Oh...before I forget...to your back add
a ribbon for hanging.

As you attach your *cone* shaped doilies you will
begin to shape them in a circle.  You will have to
overlap them in the center as you work around.
I always attach my ribbon with a button...
it gives it a more sturdy finish.

I placed a flat Doilie over my surface before I
started gluing the doilies...but you don't have to.

Okay...so now you have all your doilies glued on
it should look something like this one below.
Are'nt those edges puuuurrrty?
I just so happen to have a pink heart doilie that
I used as my base for the center decoration.
On top of that I placed a sturdy Red Heart.


I continued to layer hearts on top of each other
in varying sizes. 
The one below is actually
a fuschia color and is felt.

Then I pulled out some vintage goodies I had and
glued this to the center of my stack of hearts.
There is no right or wrong way to do the center.
I would change this out and do different colors and
even make one with a springy feel.
Let your imagination do the ruling!


Am certainly LOVING how it looks now hung
on my deep burgandy door!

Please let me know if you do this or
are gonna give it a try! I so HOPE
I have inspired you to get out and
CREATE!!!

Wanna sneak peek at some sachets I made?
These are filled with laveder and smell divine!
Can you guess what I started out with?

These are something we all have in our home...
cardboard rolls from toilet paper!
hehehehe

Be inspired and Blessed!
Lorena
I'm linking my tutorial over here..please check these beautiful Blogs out!

Wednesday, January 11, 2012

***Let the CREATING Begin...***

Hi Dear Friends!

Well, I finally have come up for air and am
done with the cleaning, rearranging and reorganizing
my Studio.

And, as promised...
I am sharing pictures so you can all enjoy
my *crazy*manic*mind* at work...lol
I have truly rethunk my room and
how I use it to come up with what I
believe is the best way for me to get the
maximum amount of work space for the
crafting, painting and little sewing that I do.


I did dismantle the drafting table and now
am using the table top as a surface for additional space to work
on.  It is connected to the folding table that is
jetting out now into the middle of the room
anchored on the wall.
Under my table top, I placed all my plastic
drawer storage bins and have them
hiding, but still keeping things I need close.
My goal was to put those things I use the most nearest.

Do you see the Printers Drawer?
I have 2 of these and decided I could put one out
for knicknacks and little things that always
seem to be around.  Now they all have
a neat place to reside, easy to find and
I even put some pretty lace that I can
use in there as well.

Below....I LOVE how the light comes through my pink
clear drawers that house those tiny little goodies
we must have to create!
Also, all those pretty boxes need to come out
for display so you see them...they
all have things I need inside but
kept tidy in a pretty contain...
doncha think?
I'm so tickled with this area below!
I found this great pink satin covered box
last week when a dear friend and I when
thriftin.  It now houses all my *pretty*
glove boxes that I keep my
clay roses I make in.

Do you see those two pink paint bottles by the
lamp...its metal paint and my green lamp
will get all *pinked* up soon!

I also cleaned up my ribbon holder and just
put out the pinks and white.  I then put the
rest close by in a drawer which make them
easy to get to.  On top you will see my
sweet lil pin holder collection that I have.

I also toned the pink on my peg board down and
then slightly changed where it was hanging.
Yet still keeping it all close to where I may need it.

If you move around the room to the right of where
my tables are...I created more storage for
paints, things that need painted and
other dear to my heart goodies.

Here I places my beloved collection
of early 1990's Victoria Magazines.
I also have decorating and idea
books here too.

Hubby helped me bring this vintage dresser
of mine back into this room.  It now
has all my trims in the drawers as well as
on top of the neat 9 drawers shoe caddy I found
which is of curse, full of lace. 

I LOOOOOVE eye candy!

Moving around the room...we are to
the door wall which has the hutch that
I created by taking two pieces and marrying them.
I decided to place all my fabrics out
where I could see them...love the color!
Then I placed on top of this, some of the roses and
ribbons, and such that I use
Sooo pretty to look at as well.


Okay...I think I'm done now...

Hope this helps inspired you to get into you
room and CREATE!  I know now that
my mind feels less cluttered, I know where
everything is and now I can get
back to doing what I love!

Be Blessed!
Lorena


Friday, January 6, 2012

***HAPPY NEW YEAR DEAR FRIENDS*** and a whole lotta organizing going on!!!

Happy New Year Dear Friends!!!

Well, I took quite a long hiatis away from blogging.
I just needed to decompress, vegg and enjoy my hubby
and daughter.   We really had a great couple of weeks
celebrating the birth of our Saviour together.
How are you all doing? Did you have a great time
with family and friends?

With the new year...I seem to take a fresh approach to
where I am and what I want to accomplish this year.
I am not one to make new years resolutions as I
truly feel the Lord is constantly changing and
directing my life daily so that resolutions are
a daily aspect of my life.

After a creatively hectic time during the holidays my
craft studio gets way outta sorts.  I decided that in
keeping with being *real* I'd share with you what
a *creative* mind looks like during this time. 
So please be prepared...it aint pretty. 

Over the past 10 years that I have had
the privaledge of pursuing my passion I see that
there is *manic* side to me.  I say this because
I crave order and organization but yet in the midst of
creating...well that part of me flys out the window!

Just see for yourself...

I wanted you my friends, to know the real me...
yes I love to share a clean fresh room so others can
ooohhhh and aaahhhh
but alas that isn't the true me, most of the time, if I am
being completely honest with you.
I can say that this room got used even by my
sweet daughter and a friend who wanted a
*craft night*.
I was soooo tickled and they wanted to use my room
and supplies.  Sometime that I don't think my
daughter has ever done.


Okay...so now the other side has kicked in
(my need for order and organization).
I am in the midst of reworking, reorganizing and
moving furniture to better suit my creative needs.
My next post, when I come up for air
and to breath life anew...
well, I am hoping to share with you
a wonderfully FRESH new start to my
creative ventures in 2012!
And to have
a room that will be heavenly to create in!

Be Blessed Dear Friends!
Lorena