Rose ~ Chic ~ Friends: My blog is all about you; friends and sharing lifes journey...My love for all things Chic; repurposed, crafted, painted in many venues... and My LOVE for all things Roses! which show up in my home and created projects.

Friday, August 30, 2013

Tweaking My Master

Hey sweet friends how are you?
 
A while back I did some tweaking in my Master Bedroom.
I finally got around to taking some pictures so you can see
what I have done.
About a month ago I painted the large Window you see
above the bed and that's was one of the many things I did.
For me, the size has always
been a challenge due to cathedral peaked ceilings
and how the room is laid out. 
Another big change was using white sheers and
newly purchased ruffly curtain panels
on this very large window. I cannot get over how
much lighter and brighter this room feels now.
So in an effort to create a more cozy feel, that I seem to
crave in my rooms, I have created vignettes all around
to help soften the spaces.
...WARNING PICTURE BELOW IS REAL...
This picture below, shows you how we live
in this room...ugly big TV is a must due to how
far away this space is from our bed.  I love my soft bed
and can hardly wait each night to jump in and watch TV.
 
The tread...well it needs to be moved to the basement,
I know it should not be here,
unfortunately it is sooooo heavy and will take
a crew of big strong men to move it. 
In the meantime,
 we do actually use it, a lot,
especially during the L O N G cold Michigan winters.
Okay back to the pretties.  I took pictures of my corners
vignettes that are full of sweet pinks and blues.


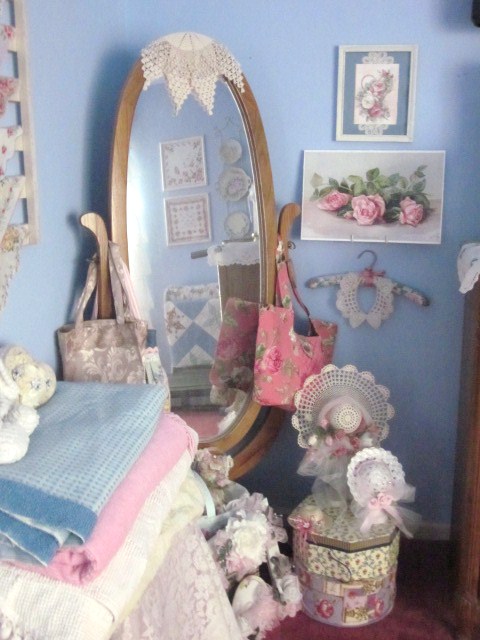
Do you see the shutters on my dresser?
I used them to hide those ugly cords hanging
from the monster TV, lol.


This is MY absolute favorite picture of Hubs and me.
Think it was taken at least 13-14 years ago.


Can you tell I like small trinkets?

I am sooooo sentimental, most of them have been given
to me...it is hard for me to let them go.

On the wall  in the picture below,
you can see my wedding dress on the left
and a sweet pink Gunne Sax on the right!

 
Now I am Happy with how this room seems to
give me a cozier feel inspite of its size.
 
Be Blessed!
 

Linked to:

Pink Saturday

Saturday, August 24, 2013

PINK Saturday ~ Creating in Pinks

Hello Friends!
 
Wow, it has been a long time since I have
been by to join our special host
Beverly, at How Sweet The Sound
for her weekly Pink Saturday!
I am so happy to be joining her this week!
 
To those of you new to my blog, well...
I create in a pink and sweet world, most of the time.
 
I have been busy in my Studio getting ready for
Fall and the upcoming Christmas Holidays.
So I am sharing a few of the goodies
I have created, now for Fall that are now available
in my Rosechicfriends etsy shoppe.
 
This darling sweet pink Pumpkin was a special order
that I did for a special etsy gal.  Lotsa pink, roses, lace
and sweet goodness for Fall.


I have also painted some smaller pumkins pink and
decorated them sweetly.  Along with my boy and
girl scarecrow, made of clay pots.
I have a tutorial in my last post for those
interested in making these sweeties.
 
Thanks so much for stopping by.
Can't wait to get out there and enjoy
Pink Saturday!
 
Be Blessed,


Friday, August 23, 2013

FALL Clay Pot ScareCrows ~ Tutorial

Hey Everyone!
Like many of you, Fall is fast approaching and I
decided to revive and share a more in-depth tutorial
about how I create these darling Clay Pot Scarecrows.
Come Join Me in the FUN!

SUPPLY LIST:

5 Clay Pots (for boy)
4-5 Clay Pots (for girl)
(POTs can be any size you wish)
Acrylic Paints/Sealer
Buttons, Trims etc.
E600 or Household Glue
Thin Sharpie

Being an AVID crafter and artist I never do these
in the same colors...your imagination is your only limit.

BELOW:
I decided since I create in a world of shabby chic
I would show you the ones I recently made up in those colors.
Also, I came up with a *Girl* scarecrow this time...
thought she turned out so darling!


DIRECTIONS:

 Select the size of Clay Pots you want to use.  I am Using
in this tutorial 3 inch pots.  I got these at Hobby Lobby, stacking
as you see in #1 of the 4 pix below. 
These were priced at $2.99, used their 40% coupon
so they ended up at $1.79.

2.  Determine the colors you will be using, then paint
as follows:

BOY
a.  bottom 2 pots Pant color
b. 3rd Pot color Shirt        
c.  4th Pot is face
 I use a  flesh tone but any light color can work
d.  5th Pot is for Hat  

GIRL
a.  2-3 Pots Painted for Skirt.
  (These 2 pots need to be slightly different in
size so that they stack correctly. Larger on Bottom
then smaller on top)
b.  3rd Pot Shirt color
c.  4th Pot hat color        

Now to begin assembling and gluing your pots on to of
each other.  You can see how to start below.  You begin
with the wider opening part as your base. 
I glue all around each
edge making sure they are secure.
Continue to stack until you have them stacked
 as you see in the bottom two
pictures of the 4 pix below.

NOW the Fun begins!
I always do a few faces up before I decide how I want
it too look.  Then using a fine tip Sharpie I added the
faces to the boy and girl.

For the arms, I did up a template.  Using Felt I had
in a fleshy tone I made 2 sets for hands, and in the
pink I did 2 up for the arms.


Once the faces are on, I seal the entire piece.
I then gather my embellishments...
buttons, ric~rac, lace and ribbon. 
For my girl, I painted my roses all around
her skirt.  On the boy, you can see faint detailing that I did
to mimic a shirt. I uses some light fringe trim I had to mimic
hair...but you could use fringes, straw etc. as well.

There is NO right or wrong way to do these.


Below I am showing you some done up in more traditional
Fall Colors.  Each one is so different and I had fun with
the trims as well.

I also have done them in larger pots as you can see
from my picture below. 

These pots can also be painted to look like toy
soldiers, as I have done below.  I pull these sweeties
out during the holiday and place by my door.


If you have any questions, or need clarification, please
do not hesitate to ask. 

I hope you will consider doing
these, they are so cute, easy and fun to do.
A great, inexpensive craft to do with children as well.

Thanks so much for stopping by,
I treasure your comments!


PS.  I am selling the pink set in my etsy shoppe!
I'd be happy to make up a set for you!

I am Linking to:

The Scoop over a White Lace Cottage this week!


Wednesday, August 14, 2013

Kitty Post


Hi Everyone!
 
My name is Tiger. 
My mom asked me to share with you about
how I take good care of her and my beloved family!
 
I was adopted over 12 years ago along with my families
other cat Chloe.  Sadly, we said goodbyeto her last June.
My mommy still misses her very much, they had a bond
and loved each other dearly.
 
I stepped into her shoes and now keep my mom very busy
loving on me, so she won't be too sad anymore.
My doctor tells me I may be a Norwegian Forrest Cat
because I am so big and fluffy.
I think I weigh over 12lbs.

Here is a picture of Chloe for you to see who I am talking about.

I love my family and now RELISH
in the fact that I am theirONLY kitty now. 
I love ALL the attention I get!
If you pet me behind my ears and jaw, I will PURR for you!
I like to talk with my family and let them know where I am
going or want to go, like in the garage or outside to eat some grass.
  I will even will follow the *girl* upstairs to her room so I can
snuggle with her. I think she's my favorite!
Shhh...don't tell the others though, cause I love them
so much too!

I am mommies lil helper when she is trying to work on
a project.  If she puts one of those yard sticks under the
material, I just might have to play with it.

I do sleep alot, and this perch by our Dining Room
window is one of my FAVs!

I also like to snoop and find fun things to do around the house!

Oh, did I tell you I like to nap? Especially on a warm
and fuzzy blanket or even a pillow?
My mom says I am getting soft in my old age.

 
During the winter you can usually find me hanging out
with my family while they watch that TV.
If they put out some of those warm
blankets over the back of a couch or chair,
well that will be where I sit.
 
Oh yeah, you know that *girl*...well I have a THANG
for her.  I think she hung the moon!  I am so going to miss
her when she goes off this year to live in her
sorority Delta Zeta house.  I hope she comes and
visits me... a lot!
 
Thanks for Stopping by!
 
Tiger


Monday, August 5, 2013

Gorgeous Ralph Lauren Tablecloth Turned Kitchen Curtains

Hey Everyone,
I thought I would share with you a project that I have been trying to work on for months.  I FINALLY finished it up today.
Let me set the stage...so to speak, for you as to why it has taken so long.
Last December, hubs and I made a major decision ($$$) and replaced all the windows in our home.  Most of the windows were a easy install...until it came to my kitchen window.  UGH.  Anyway, in the process, we changed the configuration of how this window looked.  Originally I could crank open the side windows but it had a screen inside, and quite large framing obstructions.  They were not easy to open and I had a hard time reaching them.  We went with a similar size window but it had a better viewing area.  But in the process they had to tear out all the trims and cut out more than they originally thought they would to install it.
So...my trims were new and needed painted...I did that a couple of weeks ago, wow did that
end up being a bigger project than I had anticpated...lets just say I didn't stop at the kitchen trims.
Then a few weeks back I ran into Home Goods with a friend and found a table cloth by Ralph Lauren that had ALL of my colors that I use in my kitchen/family room area, it was purchased it for $20.  And being that I LOVE roses...with this table cloth it was a no brainer for me.  I also had purchased 4 yards of a home decor fabric with small gold/red check from Hob/Lob last year for about $10. I decided that I would do a 4" trim on the bottom with this fabric...and LOVE how it looks with the Ralph Lauren fabric!
(just ignore the rooster fabric, I'll explain later)

This was a 60x106, my window measured 48x68,
I basically trimed about 12 inches off and used the rest.

I measured my window, remeasured my fabrics and was going to cut everything out
last Wednesday, when I awoke to a horrid Migraine that lasted for 3 days!  Being somewhat smart, I decided it would put this off for a few days, because I KNEW I needed a clear head. 
BOY am I glad I did!
Even with a clear head and numbers all square you can still pick the fabric up the wrong way
and pin things to be ready to sew...and then realize it isn't the right way.
THANK goodness, I did not start sewing and put both pieces out on the floor to make
sure the pattern and size were both on the same page.
Dodged a ripping out session for sure.
Below the panels were all pinned now and ready to sew.


Here is what my window looked like before...


AND... now


I actually sprayed the original tension rod I had with a textured dark brown spray paint. 
The curtains are hung through a pocket but I am thinking I may
actually get clips so that I can move them back and forth more
easily, like cafe curtains.  What would you do?

This was a simple straight line sewing project...just make sure to do your measuring twice so you only have to cut once!

I AM so loving the fresh new look!

Okay...now back to that rooster fabric...remember?
It was a cheap find at WalMart and needed to be replaced so I knew
I had enough of the check fabric and I wanted to tie the two fabrics together.
Off went my Rooster round table cloth, which I used as my template to make
a Check Table cloth for my eat in kitchen round table.


It wasn't an exact round fit, but it worked and now it will tie in so well with
my new curtains that I have up.  I still need to trim up the ends...and am planning on going back and getting another table cloth so I can make covers for the back of the chairs around the table.
Not a bad spruce up for under $50, huh?

Thanks so much for stopping by!
Be Blessed


 I am Linking up over and the Scoop!